First of all, sorry about all the site blackouts, im on a free host so thats the price i pay, soon ill hop on a paid plan though.
Second, everything is ready. I made a first video, its much longer than it needs to be and i think i rambled on, im editing it now and will upload it soon.
Category Archives: Wacom 24HD repair project
Im about to reinstall the LED lights, run them at full power and start the experiment (and record it on video)
I finally have the free time, so, first, im going to quickly make a video demonstration of the LED wiring without the monitor. So, basically just soldering the inverters power cable to the stepdown converter, i already know which color wires are 24v+ and ground, so this will apply the same either way. Then i will show how to fine tune the voltage and read the current, so anyone else knows how to set their LED strips to either normal power or maximum power. For anyone unfamiliar, the driver that comes with the LEDs only powers them at under 50% what they can handle, resulting in a dim display brightness.
Consider a graphed curve of the voltage input and the light output.
The maximum power an LED can output is generally considered to be the point at which increasing power results in less output per power, i.e, the efficiency begins to plummet. Not the top of the curve which is where increased power equals zero increased light, but the point where slope begins to change.
Heres an example.
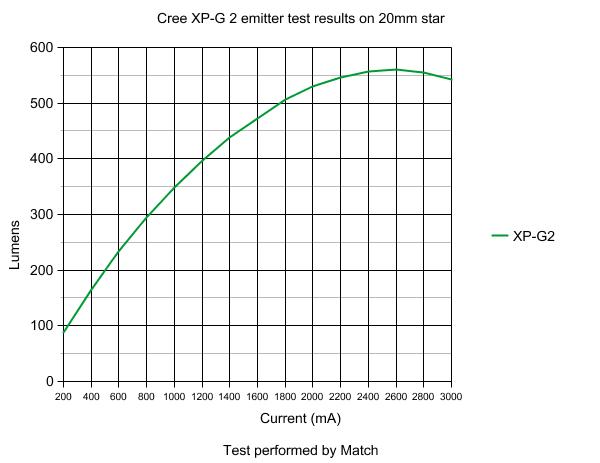
In my case, the normal safe point will be an area well below the curve, perhaps the 400 lumen point on this graph, the maximum will be about 525 lumens, and only really worked out for the sake of knowing that THAT is what the maximum is. Its not the true maximum, but, that is probably a tad higher than the LED is designed to run at, that point and beyond, may shorten the lifespan of the LED as well as possibly throwing off a slightly different color of white.
The safe point is an easily determined safe point you can probably find by feel/eyeing it. However i will be cross examining the the output results with some sort of photo-voltaic or photo-diode sensor reading on the scope to find the exact values, since no spec sheets exist for these LED strips.
Ill be sure to explain things in a way most people can comprehend, since im positive that 99% of people who are going to need this information are not going to know enough about electronics to confidently disassemble a $3000 tablet monitor
My new testing LED strip arrived, noticed something
My new strip arrived which i will use for testing, but also to replace any strips i accidentally burn out in the monitor during the long experiment, however, the strips i ordered were a little different, they didnt come with a driver, and also the writing on them is different. supposedly the operating voltage is 10-12v, they say “24W” on them and apparently have 96LEDs wheras the others that come in a kit only have 90, i havent compared either against each other as of yet or done any testing since im swamped in my uni assignments, but it may be that this particular set of LEDs might be actually stronger than what comes in the kit. Besides the writing though they look identical. Also 24W might be reffering to the fact its for a 24″ monitor. but it also might be that the combined output of the 2 strips is 24W which would be impressive.
The strips in question are called “LED strip GY-540-530MM-24W-96LED (540mm)”
Continue reading My new testing LED strip arrived, noticed something
A link to the LED backlight kit i used and more info about sourcing parts
If i haven’t provided links before, its because links on aliexpress and ebay expire, they usually cease to work if a listing sells out for too long before its relisted, or if the listing is cloned instead of relisted, the url changes. I wont be updating this URL if it ever expires or becomes invalid.
When searching for a backlight kit, search “540mm LED backlight replacement”, all kits are exactly the same, or at least ive never seen one different to this.
regardless of the alleged brand or seller, they are all identical, however i recommend the seller from the link provided because they sent my LED strips and driver in a PVC tube, Continue reading A link to the LED backlight kit i used and more info about sourcing parts
Great news, the LED backlight kits driver is dodgy, the LEDs are being underpowered! It can be brighter!
The other day i recieved another LED backlight kit identical to the one presently in my Cintiq 24HD, but it snapped in the mail as the seller somehow thought it was ok to mail inside a long card rectangular box, no packaging whatsoever, i recommend avoiding ebay for your kits even though its cheaper, on aliexpress they mail it in a PVC pipe, or cardboard pipe, or the strips come in tubes with the driver and surrounding packaging going in a bag or box or something.
Anywho, i began testing them and to my shock, sort of, the LEDs sit comfortably between 600 and 800ma, which is reached at about 9.5v or so. EACH, up to 800ma EACH. While i have not tried to measure the driver output, the input hangs around 500-600ma regardless of the voltage. It seems to cut the excess voltage above 10v as heat, as ive mentioned in a previous entry.
Got some info from the backlight supplier
I dont exactly recall how strong the LED backlight i currently have is, as i may have been a little vague, although, i do know it used 800ma max at 12v or 24v with no difference in the output, but at 24v it just got real hot so, pretty sure that 12v, 800ma is the normal output.
Roughly 10W total. Continue reading Got some info from the backlight supplier
Long thin rolls of thermal tape exist, perfect for sticking the LED strip into a monitor
I just found out that thermal tape comes in big long thin rolls, and apparently works quite well too.
This is perfect though for use in the wacom monitor, since it makes it safer to over power the backlight, and have reliable heat control.
Also, many LED backlight kit suppliers also sell the rolls of thermal tape.
Possibilities for a brighter backlight – XL4015 adjustable stepdown converter
Ok, so ive been doing a little research inspired by my obtaining that much needed step down converter for the wacoms backlight.
^ [ This is a very stable output ]
First of all, the output seems stable enough it could be used to directly drive the LEDs. its stepping down 24v to about 12v, touching it in places didnt seem to cause random jumps, which means left to itself it should be fine. Also it handled power just fine, didnt even need the heatsink (which came included).
Continue reading Possibilities for a brighter backlight – XL4015 adjustable stepdown converter
Wacom backlight demonstration outside the monitor
Here is a video of the CCFL tubes and how they fail, youll be able to see that on some tubes only one half of the tube illuminates, at those ends usually there is a char ring at the end of the tube.
Done! everything is working, everything is awesome!
I have finished the repair, the monitor is closed up and done, nothing is more reassuring though than putting something back together and having a bunch of screws left over.
Ive taken a few pictures during closing, its actually a little bit trickier than i thought. There are two pieces of metal that need to go onto the plastic shell before you place the actual monitor in it, but, if you never separate the shell and monitor you dont need to worry about it.
Also, i tested pen functions, its all good too, everything works.
Also, i neglected to photograph this but my final setup i closed the monitor with was with a resistor jammed more securely where i photographed it previously, then wrapped in kapton tape. The breadboard wires now plug into the other end of the cable that goes into the USB+fan board, the positive going into the orange slot and the negative going into the yellow as that appears to be grounded for some reason, DO NOT connect to black, traditional color coordination is not used in wacoms.
-edit- note that i may have not properly differentiated between color “brightness” (a setting like contrast) and backlight brightness, aka the light intensity.
Continue reading Done! everything is working, everything is awesome!